
Hearty Breakfast Cookies

My boys are addicted to Kashi bars, as in a nearly 3 box a week habit. This spells challenge to me, I had to see if I could make something comparable at home. I wanted a variety of grains and to keep the sugar 8g or lower, similar to the Kashi bars. I scoured the internet and found this recipe from Once a Month Mom. I am partial to oat flour and I really loved her idea of using a muffin tin, such a great solution for the fruit filled bars!
We are dairy free, so I switched the butter for coconut oil, mashed banana and chia seed gel. I wanted to get the fat down closer to the kashi bars the kids we used to, plus adding in some Omega 3’s is always a good thing! I also reduced the sugar and varied the grains a bit, adding in some quinoa flakes and almond flour – my son has been outgrowing some of his tree nut allergies (YAY!) and his allergist wants us to incorporate these new nuts into his diet. The almond flour adds, some protein but it also adds a good amount of fat – if you want to reduce the fat you can use another flour of your liking.
The kids really love them! SCORE! I haven’t worked out if they cost any less with all of the specialty ingredients but I always prefer feeding the kids something from my kitchen rather than from a box. So here we go….
Ingredients:
1.5 cups oat flour
1 cup whole wheat flour
1 cup almond flour
1/2 cup quinoa flakes
1/4 cup brown sugar
1/2 tablespoon cinnamon
1/3 cup coconut oil
1 medium banana
1 tablespoon chia seeds
1 tablespoon honey
1 tablespoon vanilla
and for the simple jam:
1 cup mixed berries – fresh or thawed frozen
2 tablespoons chis seeds
Procedure:
Start by preparing the chia seed gel, Mix 1 tablespoon of chia seeds in 1/4 cup of water and let sit for about 10 minutes or until it “gels”. The chia seed gel is great, it can be used as an egg replacer or an oil replacer – I have read that replacing up to 1/4 of the total oil with chia gel yields no difference in taste or texture.

preparing the chia seed gel
Next in a separate bowl combine the dry ingredients (oat flour, whole wheat flour, almond flour, quinoa flakes and cinnamon.

blend the dry ingredients
In another bowl, combine the brown sugar, mashed banana, melted coconut oil, vanilla, honey, and chia seed gel. Stir until combined.

Stir until combined well.
Mix the wet into the dry. I use a wooden spoon to get it started and then switch to my hands to get that last bit mixed in.

This is about when I switch to using my hands. At this point I use a motion similar to kneading bread until all of the flours are combined.
I apologize for a sudden lack of pictures, I got involved in what I was doing and forgot to capture each step!
Continue mixing until you have a large ball of dough, the dough will be a bit sticky. Place the dough ball in the fridge for about 10 minutes to firm up.
While the dough is firming up, puree the cup of berries and then stir in 2 tablespoons of chia seeds. Allow this to sit until it resembles the consistency of jam.

Chia Seed Jam
Remove the dough and divide into 36 balls, again put the dough in the fridge for a few minutes to firm up. This part is more necessary in a warm kitchen, if the dough feels workable, just keep going 🙂
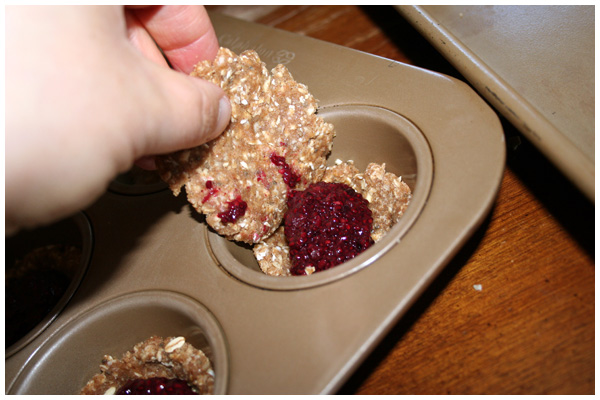
Take 18 of the balls and smoosh into the bottom of a muffin cup – there is no need to grease the cups, the cookies will pop out of an un-greased pan with ease! Fill the cups similar to how you would make a crumb pie crust, you want the sides to be higher than the center so there is a place to put the jam.
Place about 1/2 of a tablespoon (1.5 teaspoons) of jam in each depression.

Add jam to the cookie bases
Next, take the remaining 18 balls and flatten into a disc shape. Place this disc on top of the cookie base and gently press around the edges to seal. Now is also a good time to preheat your oven to 350 degrees
place the disc on top

press around the edge to seal
When you have completed assembling all of the cookies, bake them at 350 degrees for 20 minutes. Remove from the oven when the edges begin to turn golden brown. Let the cookie cool in the muffin pans for about 10 minutes and then pop out and enjoy!

NI – If you would like to reduce the fat, swap another grain for the almond flour.
A Simple Cold Rise Bread

I started making our daily bread a few months ago, I can be a bit of a control freak when it comes to the food my kids eat – especially my older son. It can be difficult to find foods safe for his multiple allergies, so I make most things from scratch. I have made bread in the past, but usually as a special occasion. I enjoy the process, but it was long, involved and required me to plan my day around bread making. A daily sandwich bread was one of the few things I bought ready-made, however it was difficult to find a bread without HFCS that was not made in a facility with tree nuts, peanuts, eggs (and our newest addition to the allergy list) dairy. Our local grocer carried one brand of wheat bread safe for my son, but at $5 a loaf I knew I could do better.
Not only is this bread easy, but it really is delightful to walk into a kitchen smelling of warm bread – so much more satisfying than opening a plastic sleeve 🙂 An unexpected positive was that we now make smaller sandwiches . The bread we had been buying had huge slices about 4″tall and 6″ wide, my pans are smaller resulting in a more reasonably sized slice.
I started with the basic white bread recipe in my Kitchenaid manual. Up until now it had been stuffed in a drawer with all of the other appliance manuals I never look at,. What me me check I have no idea, but I am glad it did because the recipe is simple, quick and I have been able to adjust it to our tastes very easily. This recipe calls for a cold rise, you knead the dough in the kitchenaid, let it rest for 20 minutes, form it into a loaf and then set it in the fridge for 2-12 hours to rise. All, I need is a 1/2 hour and then I can pop the uncooked loaves in the fridge until I am ready to bake, easy-peasy!
The original recipe called for all-purpose flour, sugar and butter; I replaced them with a mix of all-purpose wheat and bread flour, honey and coconut oil.
Here are the ingredients:
3.5 cups Bread Flour
2-4 cups All-Purpose Wheat Flour
3.5 tsp salt
3 packets or 2 tablespoons + 3/4 teaspoon Active Rise Yeast
1/4 cup coconut oil, melted
2 tablespoons honey
2 cups very warm water (between 120 and 130 degrees)
Procedure:
Add the bread flour and 2.5 cups of the all-purpose flour, salt and yeast to your mixing bowl. Mix on a low speed until combined.

Add the honey to your melted coconut oil. It help to dip the measuring spoon in the oil before measuring out the honey. Rather than waiting around as your honey slowly drips off the spoon, it will slide off of the oil coated spoon with ease.

Add the honey and oil mixture to the dry ingredients, mixing at a slow speed.

Mix at a slow speed and then, very slowly, add the hot water.

Continue to mix at a low speed until the dough forms into a ball and pulls away from the sides of the bowl. If you need to add additional flour, do so 1/2 cup at a time. I rarely have to add anymore flour to the mix. Knead with the dough hook for about 3-4 minutes.

Cover the bowl with plastic wrap and a towel, then let it rest for 20 minutes. The dough will rise slightly.

Divide the dough into two balls. On a lightly floured surface, roll out each half into a rectangle shape.
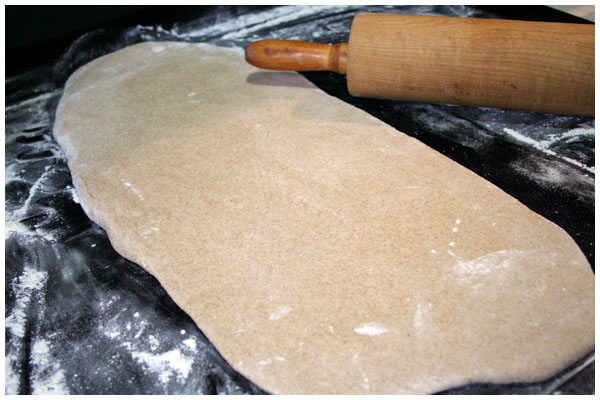
Roll up each rectangle, as you would a jelly roll. Tuck under the ends and place seam side down into a prepared bread pan.

Lightly brush the tops with the oil of your choice (I use coconut), cover loosely with plastic wrap and place in the fridge to rise for 2-12 hours.
Remove the uncooked loaves from the fridge and let rest for 10 minutes before cooking. I turn the oven on to 400 as soon as I take the loaves out, it takes just about 10 minutes for it to pre-heat.

Bake at 400 for 35-40 minutes and transfer immediately to wire racks to cool.

A word of caution:
You may not want to leave the cooling bread within reach of a 4 year old as you go to nurse a baby ….or you may end up with the perfect loaf of bread for making croutons.

At first, I thought the damage was minimal, but his little fingers tunneled to both ends! Ah well, the croutons were a nice treat 🙂
Testing out incorporating everything into one blog… Please, feel free to let me know if you totally love, or totally hate the idea of one blog 😀 Thanks!
I have been keeping two blogs, one for my photo log and another for recipes and such. I feel my other blog, Ninalemon, often gets neglected, so I am testing out putting everything here.
Recently I made the Almond Veggie Soup. I froze half as I typically do with soup, but the stuff was so darn good as soon as my first container was empty I was defrosting the second. This is the perfect time of year for soup, cool damp days just call for it. After literally eating the soup for breakfast, lunch and dinner it was gone 😦 So I made a few small modifications just for variety and viola the Pumpkin Chickpea Stew. I eased up on the Almond butter to reduce the fat and calories, tried a few different veggies, etc. It was really good… and now I’ll be eating this one for breakfast lunch and dinner…
View original post 222 more words
Portabella Pizza Heaven

Portabella Pizza
I have had these portabellas hanging out in my fridge for a few days, calling to me. I love a good grilled mushroom, the smoky meatiness is just heaven, but the grilled part is a problem for me. I have a *small* issue with fire, it scares the crapola out of me! I like a nice campfire, and will sit semi-relaxed while scanning the canopy to make sure there are no low hanging branches to catch fire. I love fireworks, but when local yokels set them off in the backyard I want to run screaming into a tub of water. My husband has been threatening to teach me once and for all how to use the grill, and since we replaced our gas grill with a charcoal grill (meaning less dangerous in my mind since it lacks the pressurized tank of flammable liquid), I was accepting of the idea. …but I just seem to always be busy with the kids when it comes to grill time… I am totally OK with having my husband be the grill man, except for nights when he is working late and I want a grilled portabella…
Tonight was one of those nights, being the Brownie Drop-Out that I am , I came up with an alternate plan ….who says only true scouts are always prepared! I popped those babies on a broiling pan and made some mini pizzas! I loaded them up with fresh herbs and tomatoes from the garden, topped with a bit of cheese and YUM!
Ingredients:
2 Portabella Caps
1 cup grape tomatoes, halved
1 tablespoon fresh basil, finely chopped
1 teaspoon fresh rosemary, finely chopped
2-3 cloves garlic, minced
2 teaspoon olive oil
2 tablespoons Italian blend cheese, shredded
salt and pepper
Procedure:
This is a quick cooking dinner, to avoid burned caps prepare the herbs and tomatoes before you start broiling the mushrooms caps.

Prepare your herbs and tomatoes.
Lightly brush washed mushroom caps with 1 teaspoon oil (about 1/2 tsp each cap), sprinkle with S&P and set under the broiler for about 4 minutes.

Brush lightly with olive oil and sprinkle with a bit of salt and pepper
Meainwhile, add the remaining 1 tsp of olive oil to a hot skillet. Briefly toss the garlic and fresh herbs, until fragrant. It will be less than 1 minute. Add the halved tomatoes and toss to coat. Remove from heat.

Briefly saute herbs, add tomatoes and toss to coat.
Divide the tomato and herb mixture between the two caps and place back under the broiler for 2 minutes.

Top the caps with tomato and herb mixture and return to the broiler
You can either serve the caps at this point without the cheese:

Broiled cap stuffed with tomatoes and herbs
Or divide the cheese between the two caps and broil for another minute or two.

Portabella Pizzas
Enjoy!
Here is the nutrition report, 2 caps is one serving:

Roasted Butternut Squash Soup with a Chipolte Kick

Roasted Butternut Squash Soup
Last week my sister sent me a link to this Spicy Zucchini Soup, it was super good and it totally got me in the mood for soup. This week the Fall weather really hit Upstate NY. We have been having beautifully cool nights and you can just feel that turn in the air. That just solidified my need for soup! With the Zucchini Soup still on my mind, I decided to make a spicy winter squash soup. I love the rich golden color of Butternut Squash and the creaminess it lends when pureed is just awesome. This soup weighs in a around 130 calories for 2 cups, it makes a caloricly light but belly satisfying lunch!
Ingredients:
2 Average sized Butternut Squash
3 large Carrots, chopped
1 large yellow onion, chopped
3 stalk of celery, chopped
3 cloves garlic, minced
2 tsp. cumin
1 tablespoon dried cilantro or a small handful fresh, chopped
3 Chipolte peppers in Adobo Sauce, minced (use more or less to suit your taste)
4-5 cups stock
juice of one lime
Salt and Pepper to taste
Procedure:
Slice the ends off of the butternut squash, cut in half lengthwise and using a spoon remove the seeds. Sprinkle with S&P.

Prepare your butternut squash
Add a few tablespoons of water to a roasting pan, place squash upside down and then cover loosely with foil. Roast squash at 400 degrees for 1 hour.

Arrange Squash in a Roasting Pan, Roast at 400 for 1 hr
When the squash is done, set it aside to cool a bit.
Add a few tablespoons of coconut oil to a hot stock pot ( you can use peanut or another high heat oil if you wish), and sweat the carrots, onions and celery for about 5 minutes.

Sweat the Veggies – full disclosure this pic is from my black bean soup. I didn’t realize I was out of celery when I started this soup!
Add the garlic, cumin, dried cilantro (if using fresh, add it at the end instead) and Chipolte peppers, turning to coat.

Imagine there is celery in this pic…
Next add about a cup of stock, to prevent the mixture from burning.
Peel the skins off of the Squash. Add the roasted squash to the stock pot.

Add the Roasted Squash to the Soup
Add the remaining stock and simmer for about 10 minutes.

Simmer together for 10-15 minutes.
Using an Immersion Blender puree the soup, add more stock if you prefer a thinner soup. If you don’t have an immersion blender, you can puree it in batches in an upright blender – be careful as the steam tends to build up and blow the top off your blender. If you enjoy making soup, I would put the immersion blender on your list – they are awesome!

Puree, adding stock if you want to thin it a bit
Add the juice of one lime and S&P to taste.
I had some leftover cornbread waffles which were perfect for dipping in the soup! You could use leftover brown rice to add some bulk and texture!
Enjoy!

Roasted Butternut Squash Soup with Chipolte
Nutrition Info per 2 cup serving:

Egg Free Chocolate Cupcakes

Egg-free Chocolate Cupcake
It has been awhile since I posted to this blog, I have been focusing on my other blog, A Day in the Eats, I really wish I could incorporate the two into one! Is there such thing as blog merges?
Anyway… we had a birthday party to attend a few weeks ago; since my son has life threatening allergies I always bring a cupcake for him. I don’t want him to feel left-out when the other kids are elbows deep in a sugar frenzy! It did take a few tries before coming up with a recipe for an eggless cake that rose well and tasted divine! I wanted to use all “normal” ingredients, but in the end I had to break down and buy the Ener-G Egg replacer. When I bought it and saw how well it worked I was a bit annoyed with myself for waiting so long! The stuff is awesome!
These cupcakes are moist, dense and delicious! The base recipe is the chocolate cake my Mother always made growing up, I make a few tweaks, but in essence it is the same.
Ingredients:
1 cup flour
1 cup sugar
1/2 cup Hershey Special Dark baking cocoa (this is safe for my peanut/tree nut/egg allergic son – always check ingredients first! Food manufacturers do change recipes and facilities often!)
1 tsp salt
1 cup boiling water
1 1/2 tsp Ener-G Egg Replacer plus 2 tbsp water
1 tbsp vanilla extract
1 tsp baking soda
1/2 tsp baking powder
3/4 stick of unsalted butter
Procedure:
Sift together the flour, sugar, cocoa and salt.

Sift together dry ingredients
Push the dry ingredients to the sides of the bowl, forming a well in the center. Cut up butter and place in the center well.

Make “well” and add butter to the well.
Add boiling water over butter and mix with wire whisk, scraping the sides as you go.

Whisk Ener-G Egg Replacer and warm water together until foamy, then add to batter with vanilla, baking powder and baking soda. Mix until combined.

Mix until combined, batter will be thin.
Scoop into paper lined or greased muffin tins. filling about 3/4 of the way. I like to use an ice cream scoop to keep things neat.

Fill muffing tins about 3/4 of the way full
Bake at 350 degrees for 12-15 minutes, if you wish to make this as a cake pour into a prepared 8″ pan and bake for 20-25 minutes.

Egg Free Cupcakes
Frost as desired and enjoy! I like to use a basic chocolate frosting (using Hershey Regular Baking Cocoa), my Mother always made a Mocha Frosting.

Egg Free Chocolate Cake
I should probably mention here that I am not paid to endorse any of the products I use, they are just the ones that work for us! 🙂
Marinated Portabella Saute, nom, nom, nom

Marinated Portabellas over pasta
My family is divided. My 3 year old and I could be happy without meat, my husband and 15 month old are carnivores. Every so often I try to sneak in some meatless dinners, this night I figured what better than portabellas! They are meaty and delicious! I marinated them in a little balsamic, olive oil, garlic and Marsala then sauteed with onions, add a little stock, cream and YUM! I am totally looking forward to eating the leftovers tomorrow.
Ingredients:
1/4 cup olive oil
1/3 cup white wine
2 tbsp balsamic vinegar
1 large garlic clove, minced
4 portabella caps
salt and pepper
1 med red onion, thinly sliced
2 cups stock, chicken or veggie
1/2 cup heavy cream
Procedure:
Combine olive oil, wine, balsamic vinegar, garlic in a ziplock or casserole dish.

Marinade
Slice portabellas into 1/2 inch strips. Combine mushrooms and marinade, allow to sit for about 20 minutes.

Add about 1 tbsp of olive oil to a large hot skillet. Saute sliced onions until translucent.

Add marinated mushrooms to the onion and cook until most of the liquid evaporates.
 Add the stock and cook down for about 20 minutes

BEFORE the stock was reduced by about 1/2
Remove the pan from the heat and stir in the cream. Serve on its own or on top of pasta, garnish with Parmesan and fresh basil.

Marinated Portabellas over pasta
I’m sorry Black bean soup, you are not the prettiest, but you may be the tastiest!

Cut up veggies, ready to start the soup!
For the past week, my house has been filled with sickness. We all have one of those lovely colds, filled with congestion that makes you feel like your head is going to explode… and you kinda wish it just would, already. I set out to make some soup, I wanted chicken but couldn’t muster the motivation to go buy a bird and roast it. Lucky for me I had some black beans soaking, and black bean is a very close second to chicken soup when I am sick.
I apologize for the lackluster images, although super yummy, black bean soup isn’t very exciting to look at. After I took the bowl pic, I thought about grabbing some avocado and cilantro to dress it up, but I just wanted to eat my soup and veg.
This is a really easy soup! I do use dry beans and re-hydrate them, but if you prefer you could use 4 (15oz) cans, drained and rinsed. I prefer to re-hydrate by soaking the beans overnight, but you can also cook the beans to re-hydrate.
Ingredients:
1 pound black beans, re-hydrated (or 4 – 15oz cans black beans)
1 tbsp coconut oil (or oil of your choice)
2 cups carrots, chopped
3 stalks celery, chopped
1 small red onion, chopped
2 bunches green onion, chopped
4 cloves garlic, minced
1 tsp cumin
1-3 tsp chili powder
1/8 – 1/2 tsp cayenne pepper
8 cups stock (veggie or chicken)
juice of 1.5 limes
salt and pepper to taste
Procedure:
Add oil to a hot stock pot. Add carrots, celery, onion and green onion and sweat the veggies. You don’t want to brown them , just soften them and allow the onions to become translucent.

My mother hates the word “sweat”, I wonder if she prefers to allow her veggies to perspire?
Add the garlic, cumin, chili powder and cayenne turning to coat the veggies. Allow them to cook and meld for a minute or two.

Spicy, perspiring veggies
Add the black beans and stock, bring to a boil and then simmer covered for about an hour. If you used canned beans or cooked your beans after an overnight soak, you will only need to simmer for about 10 minutes.

bring it up to a boil, cover and drop it down to a simmer
Add the juice of 1 and 1/2 limes. To thicken the soup a bit, I use my immersion blender to puree some of the beans and veggies in the soup. This wil give you a nice creamy soup without adding cream or flour. If you don’t have an immersion blender you can puree a few cups in your blender – just be careful!!! The steam likes to build up in the blender and blow off the lid. If you find you like making soup, I’d buy an immersion blender – they are an awesome tool to have!
Add salt and pepper to your and you are done! Enjoy your soup naked, if you are super impatient like me or you can garnish with cheese, sour cream, guacamole, avocado, fresh cilantro…..

Naked Black Bean Soup
Savory Key Lime Time

Key Lime Chickpeas with Butternut Squash and Sweet Potato over Quinoa
On a recent shopping trip, I fell in love with a bag of key limes. They were so cute and tiny and only $1.99 for the pound, I had to have them! I had visions of a key lime pie – one of my favorites, although I have never made one myself! I came home and showed my husband my prize, when he informed me that he didn’t like key lime pie. Hrmph. I thought about making the pie and eating it all myself, but that would be a bad idea since then I would have to own up to it on my other blog, A Day in the Eats . Soooo, I had to come up with a savory key lime dish. I still had a bunch of chickpeas in the fridge and a Butternut squash threatening to turn on me, it was time to experiment!
I decided to marinate and cook the chickpeas in a mix of lime juice, soy sauce and garlic, then tossed them with some sauted veggies and ate it all over some quinoa. It was so good! I love when a kitchen scramble of random ingredients is a success!
Ingredients:
3.5 cups cooked chickpeas
1/2 cup key lime juice
3/4 cup low sodium stock (chicken or veggie)
1/3 cup low sodium soy sauce
4 cloves garlic, minced
2 tbsp coconut oil (or oil of your choice)
3/4 cup red onion, thinly sliced
2.5 cups butternut squash, cubed
2 cups sweet potato, cubed
Procedure:
I juiced the fresh key limes with a fork – the little cone shaped juicer I have was too big for the limes.

Juicing these babies took some time…
Combine chickpeas, lime juice, soy sauce and garlic in a pot and allow to marinate for an hour or so.

Marinating Chickpeas
Add the chicken stock and simmer together wile you prepare the veggies.
Heat a large frying pan and add the coconut oil. Saute onion, until lightly browned.

Onions in coconut oil, one of my favorite scents!
Add the cubed sweet potatoes and butternut squash, and cook, covered over medium low heat, stirring often.

Cook until fork tender.
Combine the chickpeas and liquid with the veggies.

Add the chickpeas and liquid to the pan
Simmer until the liquid cooks away.

Get ready to eat!
Add pepper to taste!

ENJOY!
Here is the Nutritional Information, based on 6 servings:

Hummus among us

Cilantro Lime Hummus
Friday, I had plans to meet up with a friend and take our kids to see Alice in Wonderland, followed by a picnic in the park! It sounded lovely, the boys would love it, we would love it – a musical, food and fresh air – what’s not to like!?! However, Thursday night when I should have been preparing our picnic goodies I was exhausted and only thinking of bed. I knew we had to be out of the house early, but I couldn’t bring myself to do anything, which meant Friday morning I’d need something quick, filling and tasty enough for toddlers!
Hummus to the rescue! I had cooked a big batch of chickpeas a few days prior and had some cilantro that was beginning to wilt.

Sad, sad cilantro looking for a home.
I have been on this cilantro, lime cumin kick lately – why not in hummus? I threw it together and it really was delish! My friend and I loved it… the kids preferred Ken’s Blue Cheese dressing. You can’t win ’em all!

Part of my picnic lunch, nom, nom, nom.
Ingredients:
2 cups cooked chickpeas (or 1 can rinsed and drained)
1/2 cup cilantro, chopped
juice of 1 lime (about 1.5 tbsp)
2 tbsp tahini
1 tsp cumin
2 cloves garlic, minced
1/8 tsp cayenne
1/4 tsp salt
Procedure:
Add chickpeas to bowl of food processor or blender.

Try to resist snacking on them before you process them…
Process for a bit, until they have a coarse texture, then add the chopped cilantro:

Process a bit more, add the remaining ingredients and process until you reach your desired texture:

About 2 cups of cilantro lime hummus
ENJOY!

Cilantro Lime Hummus
 NinaLemon
- Hearty Breakfast Cookies
- Following my Bliss
- A Simple Cold Rise Bread
- Onion Mushroom Soup for the awkward eater.
- Untitled
- Portabella Pizza Heaven
- Roasted Butternut Squash Soup with a Chipolte Kick
- Egg Free Chocolate Cupcakes
- Marinated Portabella Saute, nom, nom, nom
- I’m sorry Black bean soup, you are not the prettiest, but you may be the tastiest!
